Door Seal Replacement – A Simple Step for Long-Term Performance
At Blentech, we design equipment that’s built to last—but like any high-performance system, a few wear parts need periodic replacement to keep things running smoothly. One of the most common? Door gaskets.
Found on equipment covers and discharge door assemblies, these FDA-approved seals play a critical role in maintaining sanitation, ensuring leak-free operation, and protecting your product integrity. Replacing them the right way—and choosing the right type—can make all the difference in uptime and long-term performance.
Customers upgrading from glue-in to press-in gaskets report better performance, fewer leaks, and less downtime.
Types of Gaskets: Glue-In vs. Press-In
Blentech uses press-in gaskets as the standard for most new equipment—they install quickly, require no adhesive or cure time, and offer a flush, sanitary fit that’s easy to clean and maintain. Glue-in gaskets are still used on legacy systems or where specific process needs apply.
Installation Tips for Success
Regardless of the type, here’s what you need to know for a clean, effective install:
1. Clean Thoroughly
- Remove old gasket and adhesive with a wire brush or wheel.
- Kerosene can be used to soften stubborn adhesive.
- Wipe with acetone or lacquer thinner and let fully dry.
Press-in Installation Instructions (click to expand)
- Start at the top center of the groove.
- Twist and press the gasket in by hand—don’t stretch!
- Cut ¼” long and push both ends snugly together.
Glue-in Installation Instructions {click to expand)
- Apply Momentive or GE SS4004 primer, wait 20–30 minutes.
- Spread RTV-108 adhesive thinly on groove bottom and sides.
- Insert the gasket in short sections (3–6 inches), press firmly.
- Leave a ¼” overlap, trim square, seal ends with adhesive.
- Wipe off excess glue. Wait 24 hours to cure.
⚠️ Watch for “waves” forming as you press the gasket in; work them out so the seal sits evenly around the door. In the incorrect installation photo, you can see a variation in height—especially around corners—which is a clear sign of improper installation.

Tip: Removing the door makes installation easier (and it’s a great time to replace worn hinge pins).
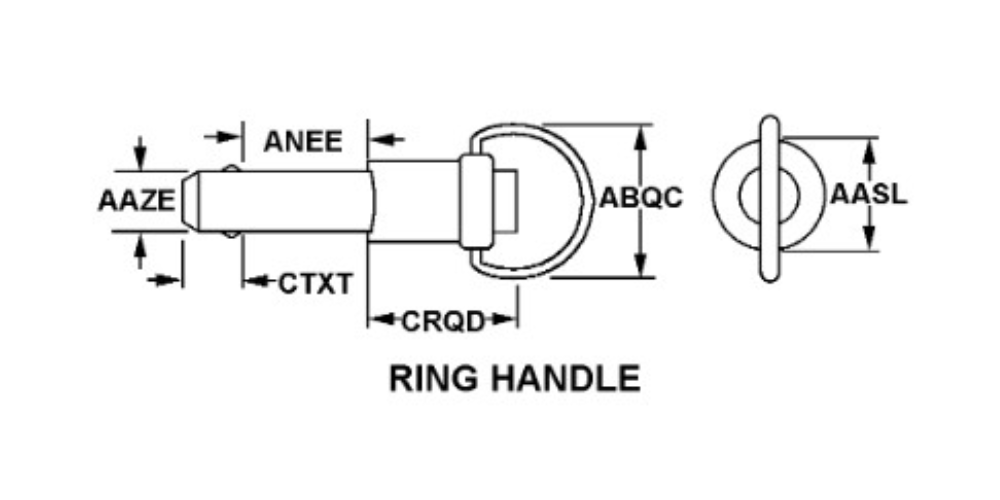
Consider upgrading to quick-release discharge door pins for faster maintenance.
Sanitary Performance Matters
Diagram:
Quick Release Door Pin

Gaskets aren’t just mechanical components—they’re part of your food safety system. Our press-in gasket design prevents product buildup, reduces contamination risk, and ensures a flush, leak-free seal. Customers upgrading from glue-in gaskets report better performance, fewer leaks, and less downtime.
Why It Matters
- Faster Turnaround: Press-in gaskets = no waiting = no lost shifts.
- Longer Life: Reduced mechanical stress = fewer replacements.
- Improved Food Safety: Sanitary, flush-mounted, product-safe materials.
- Metal-detectable options available
- Lower Cost of Ownership: Fewer leaks, fewer failures, better ROI.
Ready for Service?
Whether you’re replacing a worn seal or upgrading to press-in, we’re here to help. Our team can guide you through the right gasket for your application—and if needed, a new door assembly with a press-in design.
Have questions? Our Parts & Service team is just a call or email away.